Easy way Make Homemade Twix Bites
I still remember the first time I made homemade Twix bites with my daughter Lila. She’d come home from school raving about a classmate’s birthday treats, and I promised we’d recreate them together. Mark used to say the best memories happen in the kitchen, and he was right.
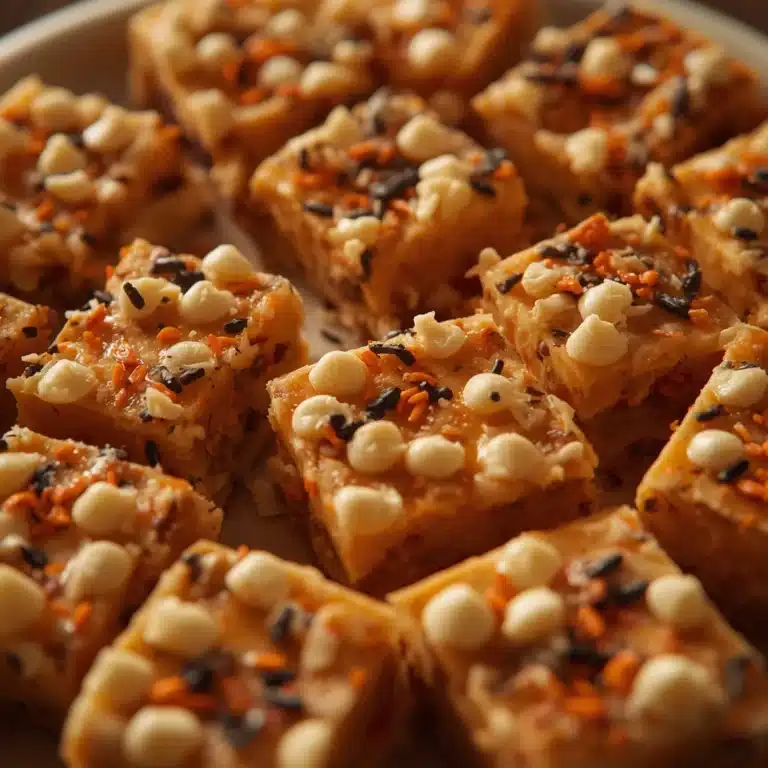
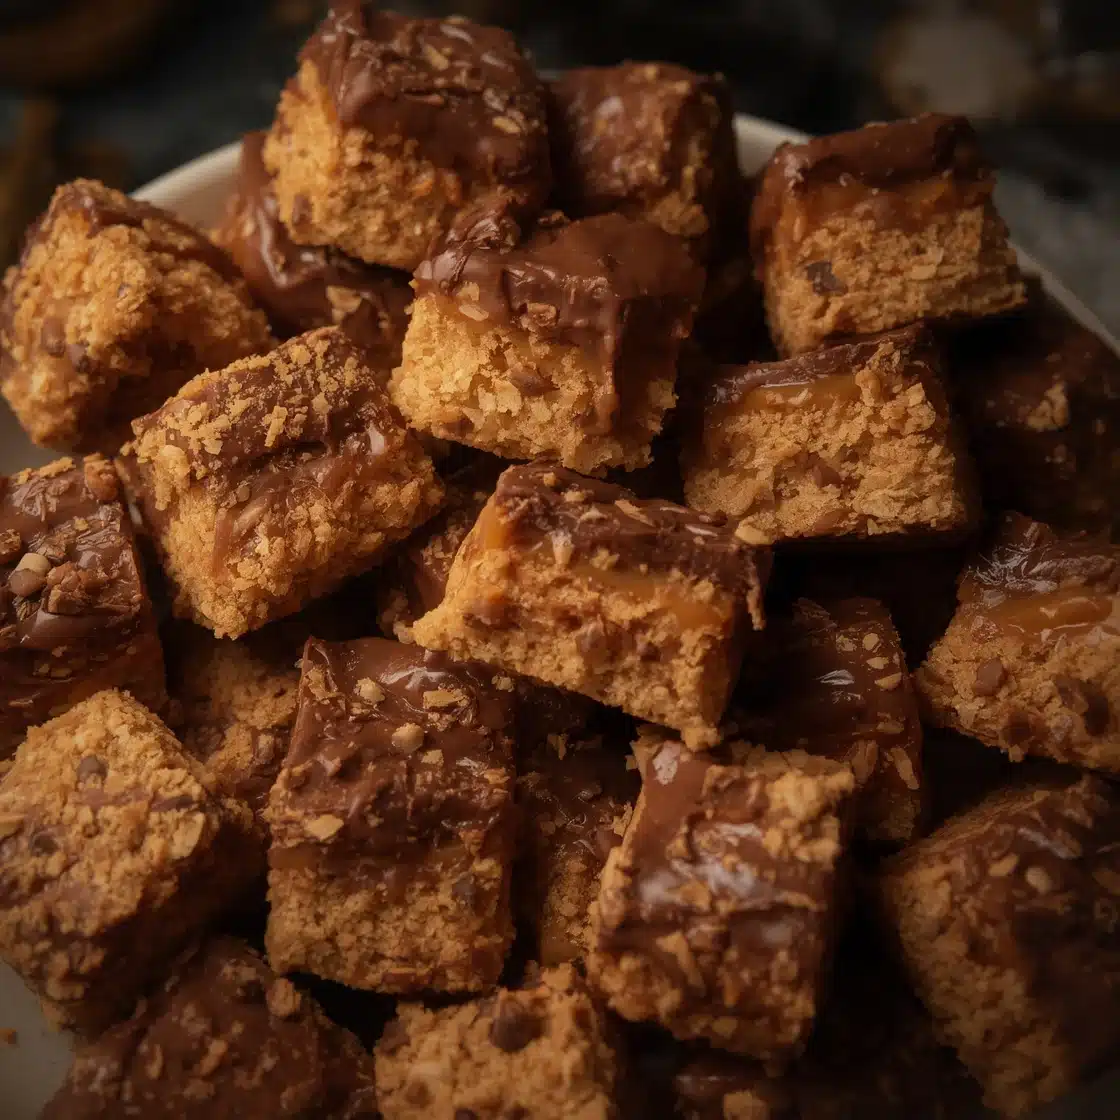
That Saturday afternoon, Lila and I stood side by side, melting chocolate and spreading caramel, our hands sticky and our hearts full. These homemade Twix bites have since become our special treat for birthdays, celebrations, and those days when we just need a little sweetness. Jack now requests them for every school event, and honestly, I can’t blame him. These little squares of heaven combine buttery shortbread, gooey caramel, and rich chocolate into one perfect bite.
Why You’ll Love These Homemade Twix Bites
These homemade Twix bites capture everything magical about the classic candy bar, but better. First, you control every ingredient that goes into them. Additionally, they’re surprisingly simple to make despite looking impressive.
The buttery shortbread base melts in your mouth, while the caramel layer adds that signature chewiness we all crave. Furthermore, the chocolate topping brings everything together beautifully.
My sister Grace, who visits every Sunday, says these Twix bites are dangerous because she can’t stop at just one. The homemade version tastes fresher and less processed than store-bought candy bars. Moreover, you can customize them to your family’s preferences.
I’ve made them dozens of times, and they always disappear within hours. Even my dad, who’s quite the perfectionist in the kitchen, gave them his seal of approval.
The best part? You probably already have most ingredients in your pantry. These homemade Twix bites make wonderful gifts too.
I’ve wrapped them in cellophane bags for teacher appreciation gifts, and they’re always a hit. The combination of texturescrispy, chewy, and smoothcreates an irresistible treat that rivals any bakery confection.
Ingredients You’ll Need
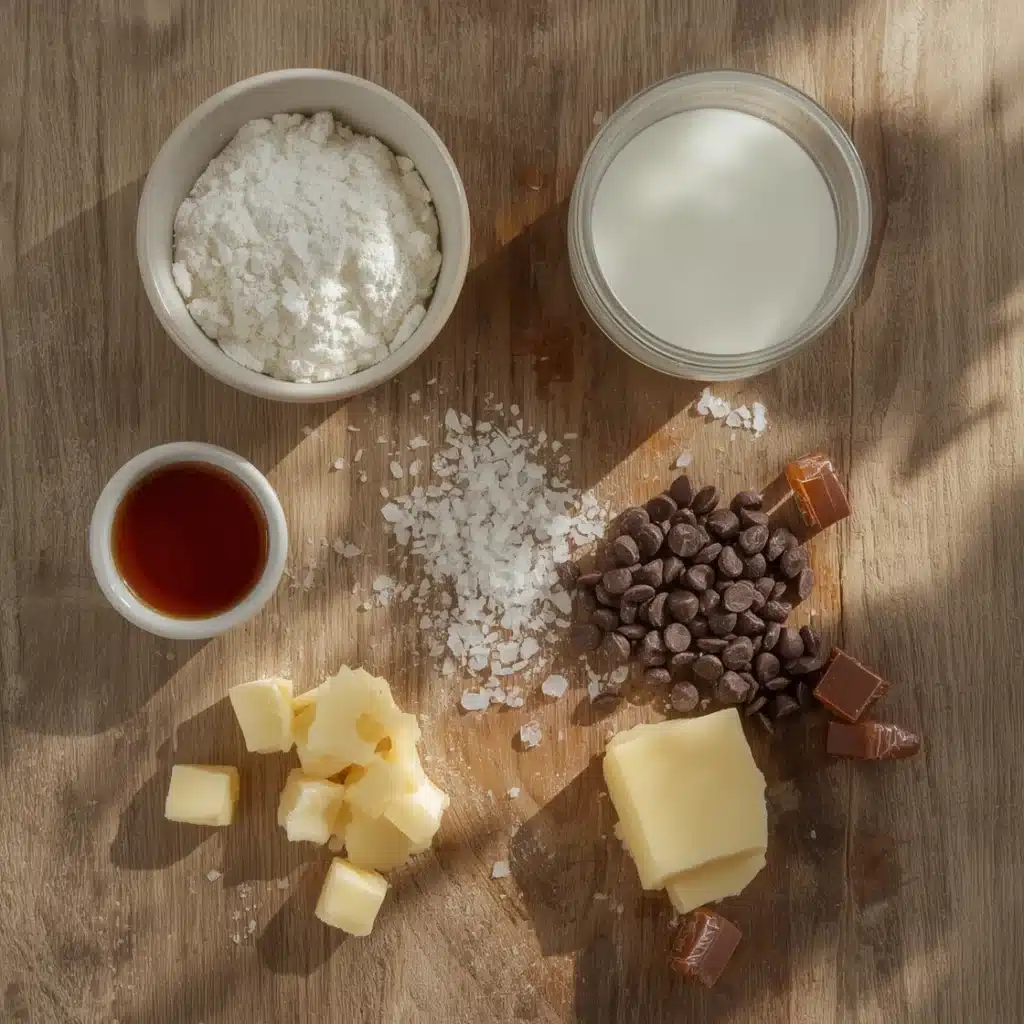
Gathering ingredients for homemade Twix bites is straightforward. I keep these staples on hand because my kids request these treats so often. Here’s everything you need to create these delicious copycat candy bars:
| Ingredient | Amount |
|---|---|
| All-purpose flour | 2 cups |
| Powdered sugar | ½ cup |
| Unsalted butter (cold, cubed) | 1 cup |
| Vanilla extract | 1 teaspoon |
| Salt | ¼ teaspoon |
| Caramel candies (unwrapped) | 14 ounces |
| Heavy cream | 3 tablespoons |
| Milk chocolate chips | 2 cups |
| Coconut oil or shortening | 1 tablespoon |
These measurements create a perfect 9×13 inch pan of homemade Twix bites. I always use quality chocolate because it makes a noticeable difference in the final product. Lila loves helping me unwrap the caramels, though she occasionally sneaks one or two.
Substitutions & Variations
Creating homemade Twix bites leaves plenty of room for creativity. I’ve experimented with numerous variations over the years. For a gluten-free version, substitute the all-purpose flour with a 1:1 gluten-free baking blend. The texture stays remarkably similar.
Instead of store-bought caramels, you can make homemade caramel sauce. This takes extra time but delivers incredible flavor. Dark chocolate works wonderfully if you prefer less sweetness.
Grace sometimes adds a sprinkle of sea salt on top of the chocolate layer for a salted caramel twist. This variation has become incredibly popular with my kids’ friends.
For a different flavor profile, try adding ½ teaspoon of espresso powder to the chocolate layer. The coffee enhances the chocolate’s richness without making the Twix bites taste like coffee. You can also press chopped pecans or almonds into the caramel before adding chocolate. Additionally, white chocolate creates a beautiful contrast and tastes amazing with the caramel.
If you’re dairy-free, coconut cream works in place of heavy cream, and dairy-free chocolate chips are readily available. I’ve made this version for Lila’s friend who has dairy allergies, and it turned out fantastic.
Step-by-Step Instructions
Making homemade Twix bites involves three simple layers. Don’t let the steps intimidate youI promise they’re easier than they look. Just take your time, and you’ll create something amazing.
Step 1: Preheat your oven to 350°F. Line a 9×13 inch baking pan with parchment paper, leaving some overhang on the sides. This makes removing the Twix bites much easier later.
Step 2: Combine flour, powdered sugar, and salt in a large bowl. Add the cold, cubed butter and use a pastry cutter or your fingers to work it into the flour mixture. Continue until the mixture resembles coarse crumbs. Mix in vanilla extract.
Step 3: Press the shortbread mixture firmly and evenly into the prepared pan. Use the bottom of a measuring cup to create a smooth, compact layer. Prick the surface all over with a fork to prevent bubbling.
Step 4: Bake the shortbread for 20-25 minutes until the edges turn lightly golden. The center should look set but not browned. Remove from the oven and let it cool completely in the pan.
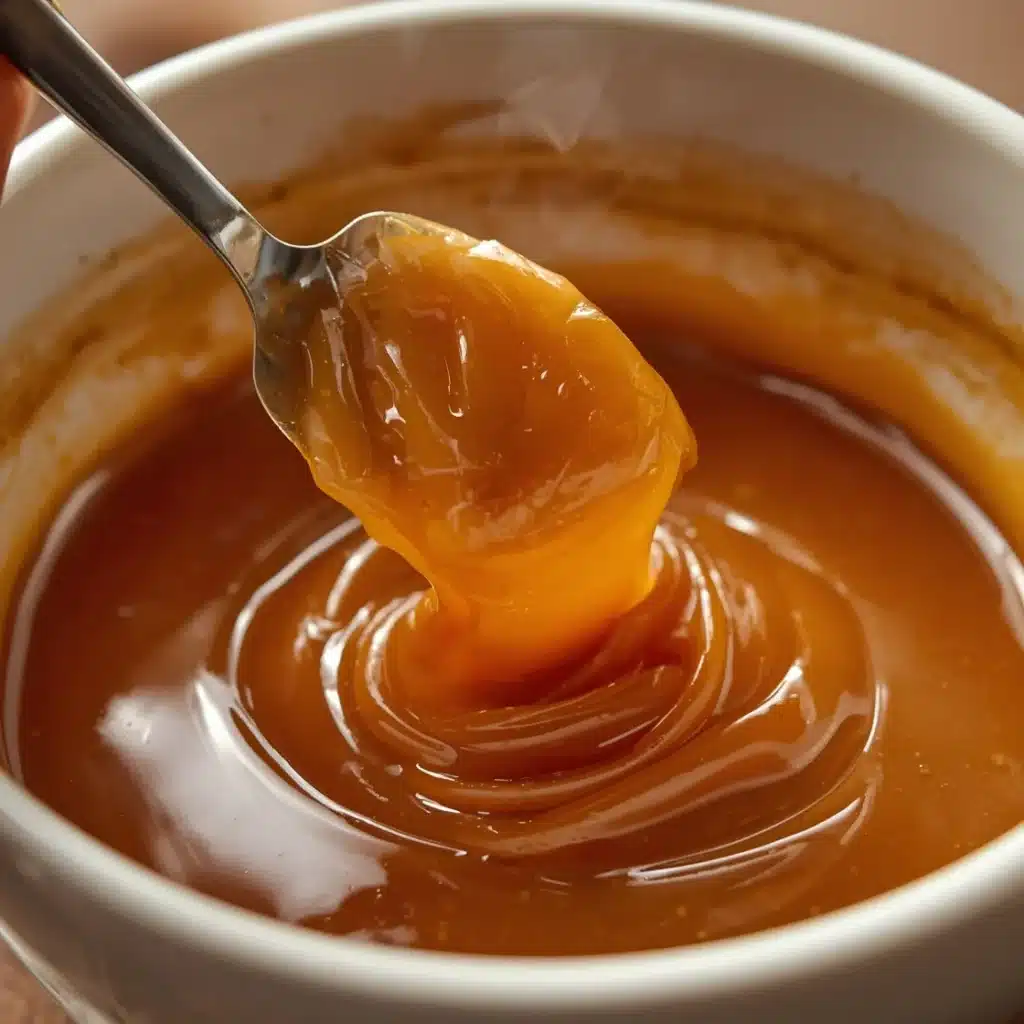
Step 5: While the base cools, prepare the caramel layer. Combine unwrapped caramels and heavy cream in a microwave-safe bowl. Microwave in 30-second intervals, stirring between each, until smooth and fully melted. This usually takes 2-3 minutes total.
Step 6: Pour the melted caramel over the cooled shortbread base. Spread it evenly using an offset spatula. Work quickly because the caramel sets as it cools. Refrigerate for at least 30 minutes until the caramel firms up.
Step 7: Melt chocolate chips with coconut oil in the microwave using 30-second intervals, stirring between each. The coconut oil helps create a smooth, glossy finish on your homemade Twix bites.
Step 8: Pour the melted chocolate over the caramel layer. Spread evenly to cover completely. Refrigerate for another 45 minutes until the chocolate sets firmly.
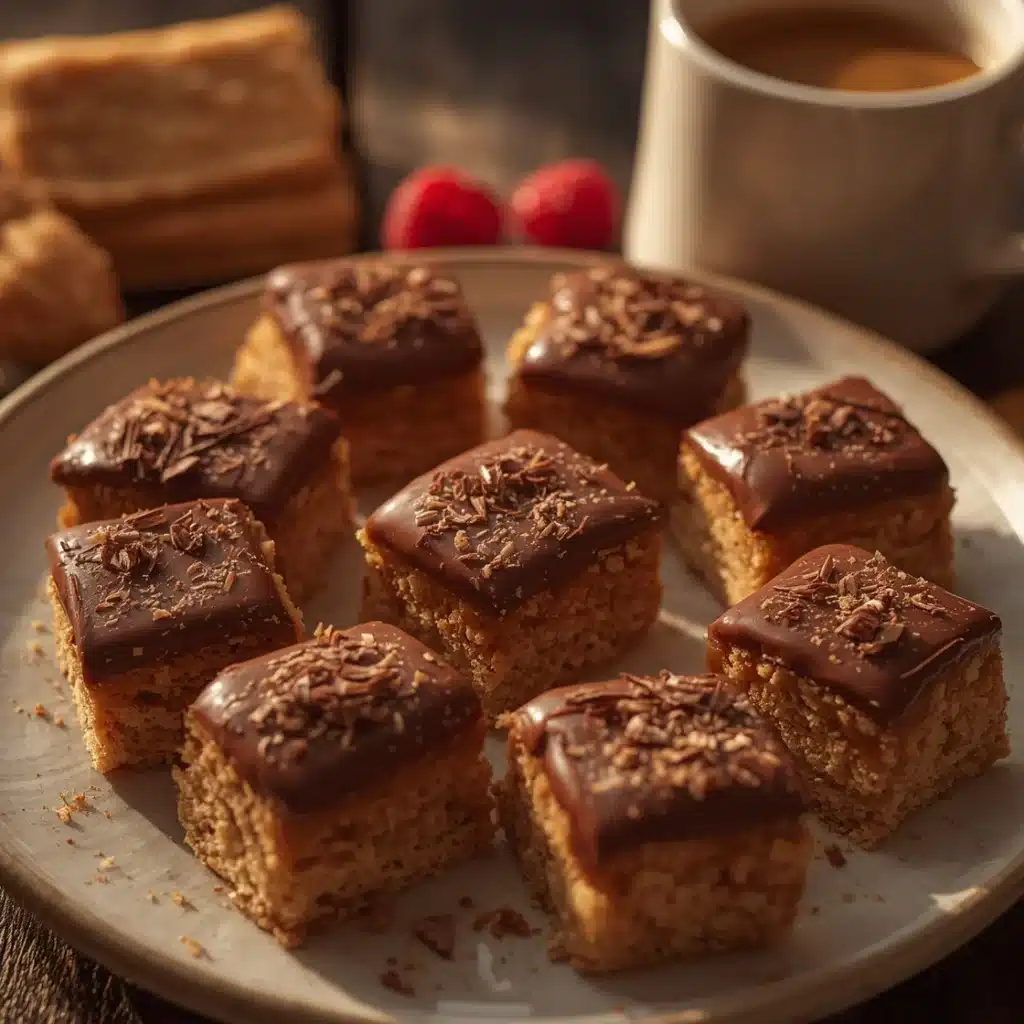
Step 9: Using the parchment paper overhang, lift the entire block out of the pan. Place it on a cutting board and use a sharp knife to cut into small squares. Wipe the knife clean between cuts for neat edges.
Pro Tips for Success
After making homemade Twix bites countless times, I’ve learned several tricks that guarantee perfect results every time. These tips come straight from my kitchen experiments and occasional mishaps.
First, always let each layer cool completely before adding the next one. Patience prevents the layers from mixing together. I learned this the hard way when I rushed and ended up with swirled layers instead of distinct ones.
Second, use a hot, dry knife for cutting. Run your knife under hot water, dry it thoroughly, then make your cuts. This creates clean, professional-looking Twix bites without ragged edges. Jack loves helping with this step because he enjoys seeing the perfect squares.
Third, press the shortbread base firmly into the pan. Loose crumbs create an unstable foundation. I use the bottom of a glass to really pack it down. Additionally, don’t skip pricking the dough with a forkthis prevents air bubbles from forming during baking.
Fourth, work quickly when spreading the caramel. It thickens as it cools, making spreading difficult. If it becomes too thick, pop it back in the microwave for 10-15 seconds. Furthermore, slightly warming your offset spatula under hot water helps spread the caramel smoothly.
Finally, store homemade Twix bites in a cool place. They can become messy in warm temperatures. During summer, I keep them refrigerated until serving time. This maintains the perfect texture and prevents melting disasters.
Storage & Reheating Tips
Proper storage keeps your homemade Twix bites fresh and delicious for days. I’ve tested various storage methods to find what works best. Store these treats in an airtight container with parchment paper between layers. This prevents them from sticking together.
At room temperature, Twix bites stay fresh for up to 5 days if your kitchen isn’t too warm. However, I prefer refrigerating them, which extends their life to 2 weeks. The refrigerator keeps the chocolate firm and the caramel at the perfect chewiness. Remove them about 10 minutes before serving for the best texture.
You can also freeze these homemade Twix bites for up to 3 months. Place them in a freezer-safe container with parchment paper between layers. Thaw them overnight in the refrigerator before enjoying. Grace often makes double batches and freezes half for later treats.
Avoid storing them in overly warm places, as the chocolate will bloom and develop white streaks. While this doesn’t affect taste, it doesn’t look as appetizing. Keep them away from strong-smelling foods because the chocolate can absorb odors.
What to Serve With This Recipe
These homemade Twix bites shine beautifully on their own, but they also complement many beverages and desserts. I love serving them alongside hot coffee during afternoon gatherings. The bitterness of coffee balances the sweetness perfectly.
Cold milk is another classic pairing, especially for kids. Lila and Jack enjoy dunking their Twix bites in milk after school. For adult gatherings, I serve them with espresso or cappuccino. The combination creates an elegant after-dinner treat.
They work wonderfully on dessert platters alongside cookies, brownies, and fruit. I often include them in holiday cookie boxes because they add variety and visual appeal. Hot chocolate topped with whipped cream makes another delightful pairing during winter months.
For parties, arrange homemade Twix bites on a platter with fresh strawberries and raspberries. The fruit’s tartness cuts through the richness nicely. Vanilla ice cream topped with a chopped Twix bite creates an incredible sundae that my kids absolutely adore.
During summer barbecues, I serve them chilled from the refrigerator. They provide a sweet ending to grilled meals without being too heavy. Additionally, they pair nicely with sparkling water or iced tea for a refreshing contrast.
FAQs
Can I use store-bought caramel sauce instead of caramel candies?
Yes, you can substitute caramel sauce for candies when making homemade Twix bites. Use about 1½ cups of thick caramel sauce. However, ensure it’s thick enough to set properly.
Thin caramel sauce won’t hold its shape and might seep into the shortbread layer. I’ve found that dulce de leche works exceptionally well as an alternative.
Why is my shortbread base crumbly?
A crumbly shortbread base usually means insufficient butter or inadequate pressing. Make sure you press the dough very firmly into the pan before baking. The mixture should hold together when squeezed.
Additionally, don’t overbake the shortbread, as this can dry it out. Your homemade Twix bites need a sturdy foundation, so really compact that base well.
How do I prevent the chocolate from cracking when cutting?
Let your homemade Twix bites sit at room temperature for about 10 minutes before cutting. This allows the chocolate to soften slightly. Use a large, sharp knife heated under hot water, then dried completely.
Make smooth, confident cuts rather than sawing motions. Wipe the knife clean between each cut for the neatest results.
Can I make these without a microwave?
Absolutely! You can melt both the caramel and chocolate using a double boiler method. Place a heat-safe bowl over a pot of simmering water, ensuring the bottom doesn’t touch the water.
Stir frequently until melted and smooth. This method gives you more control and prevents burning, though it takes slightly longer than making Twix bites in the microwave.
How can I make the caramel layer thicker?
For a thicker caramel layer in your homemade Twix bites, simply use more caramel candiesabout 18-20 ounces instead of 14. Alternatively, make a double batch of caramel. You can also reduce the amount of heavy cream to 2 tablespoons, which creates a firmer, thicker caramel. Just spread it quickly before it sets.
Nutrition Information (per serving)
Based on cutting the pan into 24 homemade Twix bites, here’s the approximate nutrition information per piece:
| Nutrient | Amount |
|---|---|
| Calories | 195 |
| Total Fat | 11g |
| Saturated Fat | 7g |
| Cholesterol | 22mg |
| Sodium | 65mg |
| Total Carbohydrates | 23g |
| Dietary Fiber | 1g |
| Sugars | 15g |
| Protein | 2g |
These homemade Twix bites are definitely an indulgent treat, perfect for special occasions and celebrations. While they’re not an everyday health food, they bring joy and sweetness to life’s special moments. Mark always said that homemade treats made with love nourish the soul as much as the body. I serve them in moderation and enjoy every delicious bite alongside my family.
Print
homemade twix bites
- Total Time: 122 mins
- Yield: 24 servings 1x
Description
These homemade Twix bites capture everything magical about the classic candy bar, but better. They combine a buttery shortbread base, gooey caramel, and rich chocolate into one perfect bite. They are surprisingly simple to make and can be customized to your family's preferences, making them a wonderful treat for any occasion or gift.
Ingredients
2 cups All-purpose flour
½ cup Powdered sugar
1 cup Unsalted butter (cold, cubed)
1 teaspoon Vanilla extract
¼ teaspoon Salt
14 ounces Caramel candies (unwrapped)
3 tablespoons Heavy cream
2 cups Milk chocolate chips
1 tablespoon Coconut oil or shortening
Instructions
- Preheat your oven to 350°F. Line a 9×13 inch baking pan with parchment paper, leaving some overhang on the sides
- Combine flour, powdered sugar, and salt in a large bowl. Add the cold, cubed butter and use a pastry cutter or your fingers to work it into the flour mixture. Continue until the mixture resembles coarse crumbs. Mix in vanilla extract
- Press the shortbread mixture firmly and evenly into the prepared pan. Use the bottom of a measuring cup to create a smooth, compact layer. Prick the surface all over with a fork to prevent bubbling
- Bake the shortbread for 20-25 minutes until the edges turn lightly golden. The center should look set but not browned. Remove from the oven and let it cool completely in the pa
- While the base cools, prepare the caramel layer. Combine unwrapped caramels and heavy cream in a microwave-safe bowl. Microwave in 30-second intervals, stirring between each, until smooth and fully melted. This usually takes 2-3 minutes total
- Pour the melted caramel over the cooled shortbread base. Spread it evenly using an offset spatula. Work quickly because the caramel sets as it cools. Refrigerate for at least 30 minutes until the caramel firms up
- Melt chocolate chips with coconut oil in the microwave using 30-second intervals, stirring between each
- Pour the melted chocolate over the caramel layer. Spread evenly to cover completely. Refrigerate for another 45 minutes until the chocolate sets firmly
- Using the parchment paper overhang, lift the entire block out of the pan. Place it on a cutting board and use a sharp knife to cut into small squares. Wipe the knife clean between cuts for neat edges
Notes
Always let each layer cool completely before adding the next one to prevent mixing.
Use a hot, dry knife for cutting to create clean, professional-looking Twix bites. Wipe the knife clean between cuts.
Press the shortbread base firmly into the pan using the bottom of a glass to ensure a sturdy foundation. Prick the dough with a fork to prevent air bubbles.
Work quickly when spreading the caramel as it thickens as it cools. If it becomes too thick, re-microwave for 10-15 seconds. Slightly warming your offset spatula under hot water also helps.
Store homemade Twix bites in an airtight container in a cool place, preferably refrigerated, for up to 2 weeks. They can be frozen for up to 3 months. Thaw overnight in the refrigerator before enjoying.
For variations: use 1:1 gluten-free baking blend for a gluten-free version, make homemade caramel, use dark chocolate, add sea salt, espresso powder, chopped pecans or almonds, or white chocolate. For dairy-free, use coconut cream and dairy-free chocolate chips.
To prevent chocolate cracking, let Twix bites sit at room temperature for about 10 minutes before cutting. Make smooth, confident cuts.
To make a thicker caramel layer, use 18-20 ounces of caramel candies or reduce heavy cream to 2 tablespoons.
You can melt caramel and chocolate using a double boiler method if you don't have a microwave.
- Prep Time: 25 mins
- Cook Time: 22 mins
- Category: Dessert
- Method: Baking
- Cuisine: American
Nutrition
- Serving Size: 1 piece
- Calories: 195 kcal
- Sugar: 15g
- Sodium: 65mg
- Fat: 11g
- Saturated Fat: 7g
- Carbohydrates: 23g
- Fiber: 1g
- Protein: 2g
- Cholesterol: 22mg
Confectionery, the art of making sweets, encompasses a vast range of delightful treats, from simple candies to elaborate desserts. Many popular commercial candies, such as the classic Twix bar, inspire home bakers to recreate these beloved flavors in their own kitchens, often allowing for ingredient customization and a fresh taste, making the process of confectionery a truly rewarding experience.